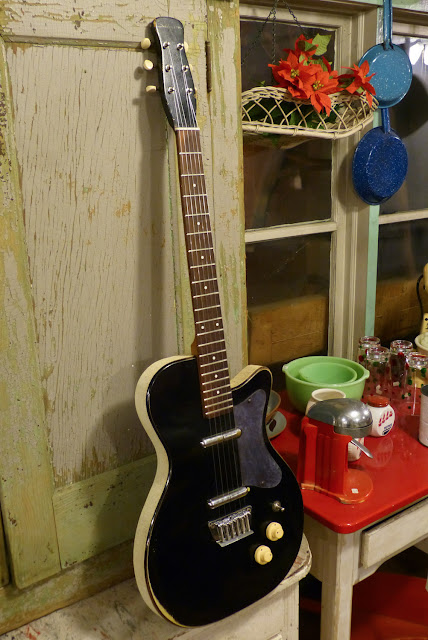
1958 Danelectro-made Silvertone U2 Electric Guitar
Just a note if you've already listened to the soundclip -- this guitar is strung-up "Nashville" style and is actually double-re-entrant as the owner likes to keep his Nashville-tuned "low E" at the same pitch as the normal high E.
Blog followers know I'm a fan of vintage Danelectros and, I'll admit, as soon as this came in via a customer needing work on it, I felt a tinge of lust. He wanted to make it a dedicated "Nashville-strung" (where the EADG is up an octave and in this case that low E is up two octaves) guitar and so the work on this was geared towards that. It received a heavy-handed fret level/dress (these tend to get that "bolted-neck hump" at the neck join), a mod to the bridge to make it fully-adjustable, a new bone nut, and a general setup. It plays bang-on perfect and has, as you'd expect, a deliciously chimey tone.
My favorite thing about original U2-model Danos is that their wiring for the two pickups is configured neck/both in series/bridge at the 3-way switch. This gives your middle position an automatic boost in output and, if you've got your amp dialed-in, initiates that perfect mwah of light overdrive to thicken the tone just-so.
This Dano (bearing the Sears "Silvertone" brand and a serial that dates it to '58) has just the right amount of wear to add a yummy amount of fade to its edges.
These guitars look like hobby-shop solidbodies, but they're actually a top and back made from masonite with "ribs" and a semi-hollow-style centerblock (for the bridge) made from poplar and/or pine. So -- while you might expect them to have the brighter bark and lingering sustain of a solidbody, Danos actually play more like hollowbodies in the way that their overtones aren't excessive and the notes are pretty fundamental. It's a good construction match for the chimey-but-even lipstick pickups.
While an aluminum nut would be original, I chose to replace the one on this particular guitar with a bone nut. The aluminum one was cut a little strange at the factory and so this was an improvement for spacing. Of course, though, I've stashed it in a baggie for the owner to retrofit later-on if desired.
For specs-buffs -- the nut on these measures 1 5/8" but feels like 1 11/16" due to the comfy but medium-round (for an electric) profile on the rear. This is a long-scale Dano and has a 25" scale length.
For specs-buffs -- the nut on these measures 1 5/8" but feels like 1 11/16" due to the comfy but medium-round (for an electric) profile on the rear. This is a long-scale Dano and has a 25" scale length.
Dano necks tend to be poplar with Brazilian rosewood fretboards. The radius is flattish but the frets are jumbo-sized (a good thing). Two steel rods glued into the neck (rather than adjustable) are used reinforcement and, granted that the guitars aren't abused with heavier gauges, the necks tend to remain stable and more-or-less straight. I find that the most they usually need is a good fret level/dress to bring them back to spec.
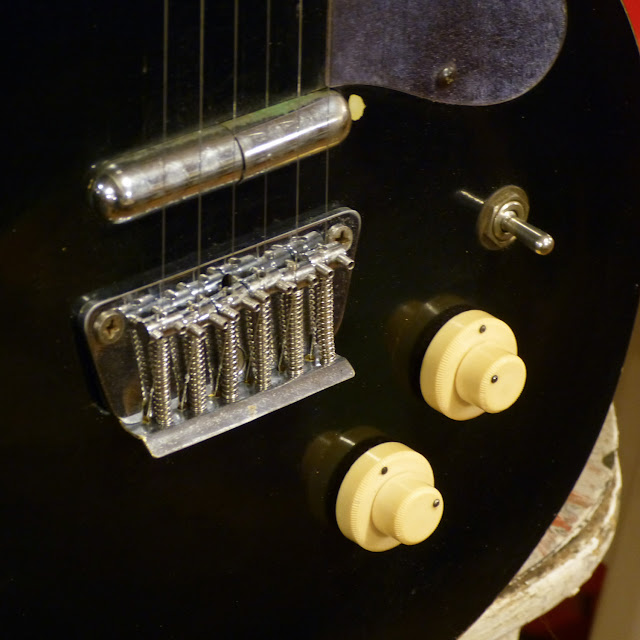
So, I've tried a few different ways to bring old Dano-style bridges into the future. The first time around, I simply modified the original saddle to give it better intonation at its leading-edge. The next time I actually drilled the bridge baseplate out and added Tele-style 3-piece compensated saddles.
This time I made a new backplate from an old metal pickguard (Duo-Sonic style) and then mated that to the original baseplate for the bridge simply by tucking it under and securing it with the rear bolt that holds the bridge down. I used the right-offset saddles and adjustment screws from one of those 6-saddle Tele-style bridges (they were in my parts-bin) and mounted those off of my new backplate.
It's very effective, looks vintage-realistic, and works beautifully to keep the guitar in tune -- especially if, down the road, the owner wants to restring this for standard tuning and will need to intonate his guitar to suit! It can also be entirely reversed and the original hardware reinstalled in just a few minutes (but why?).
The height-adjustment screws for the saddles run a little tall, but that's mostly because half are borrowed from whatever I had on hand. I didn't want to shim the neck pocket, either, as I wanted to keep the strings as close as they can be to the tops of the pickup covers.
I aligned the string-mounting holes with the original string-mounting notches on the bridge baseplate. The other alteration to the bridge was moving the front bridge-holder screws to the top of the baseplate where they simply function to hold the bridge down rather than function to adjust overall height of the bridge.
I like seeing a few love bites!
The tuners got a lube and work well-enough.


Comments