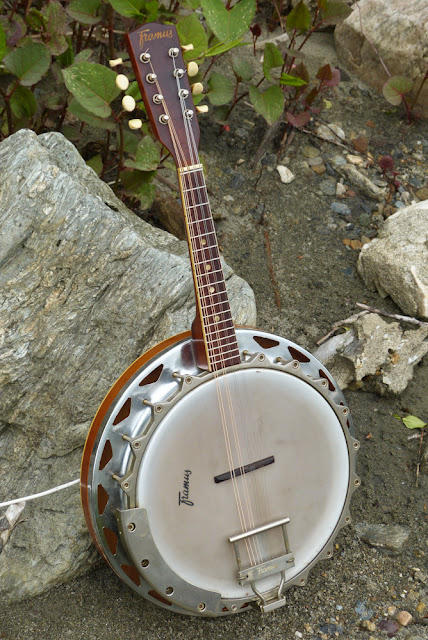
1960s Framus "Dixie Series" Resonator Banjo Mandolin
These earlier German-made Framus banjo designs are a much classier interpretation of "German heavy metal" than their heavier, later versions. This one appears to be an early to mid-60s variant on the "Dixie-Series" banjo line (judging by the Framus Vintage information), though I'm not sure of the model's exact number.
This one came in on consignment and the owner nonchalantly said, "oh, it probably just needs a setup and strings." If I had a dollar for every time I've heard that line! But seriously, banjo-mandolins are especially nervous instruments and need a cool hand to tame them to the sublime jug-band-deliciousness they are capable of.
At the end of the post you can see some of my internal adjustments (with the resonator off), but suffice to say it got a fret level/dress, a bit of bridge modification, new strings (30w, 20w, 13, 9 extra-light gauges), cleaning, and of course that very-useful setup -- in just under a couple hours' time. Playability is spot-on at 1/16" action at the 12th fret and it has a loud, big sound. The neck deflects ever-so-slightly (1/64" at most) on the treble side when tuned to pitch, but it's a non-issue playability-wise.
Check out the interesting position of the bridge! On your average American-made banjo-mando, the rims are usually smaller (10" to 10 1/2" -- this one is 11") and the neck joins the rim closer to the nut. Just like a tenor banjo, this banjo-mandolin has a full 17 fret clear of the pot, however, which means the bridge placement is a lot higher on the head (basically, as if the bridge location has "flipped sides" compared to a normal American-style jo-mando).
In the end, this configuration is actually ideal because the instrument's "bottom end" juts-out a little farther and the big 14" resonator-back sits in your lap to push the neck up more like an acoustic mandolin on a strap. It feels more "serious" and the fret access is nice to have.
Also, compared to later Framus banjo instruments, this has a fairly "light" build. The rim isn't wood on this -- the flange and rim are all one-piece plated steel, as far as I can tell, and the "donut-style" (or Bacon-style, rather) tonering/top edge is integrated, too.
The neck is one-piece mahogany and the nut width is 1 1/8" over a rounded-C profile. Note the zero fret -- gotta love those when they're done right -- and this one has been leveled to match the rest of the frets... and so it is done right.
The frets are smallish (they remind me of teens/20s Gibson mandos) and set in a rosewood board with binding. The board is ever-so-slightly radiused and the neck feel is pretty modern. This has a standard-issue 13 7/8" scale length.
The head is "top-tension" adjustable -- meaning that if you want to tighten it you just need an allen wrench to turn those bolts.
The rosewood bridge needed a bit of cutting-down but performs nicely. I've compensated it as much as I could.
The tailpiece is immense and impressive -- and, a word of warning, only accepts ball-end strings. Note that the down-pressure bar is adjustable for length. How cool is that? It's also very useful since the bridge sits so far forward o this. At the "butt" of the tailpiece is the usual down-pressure adjuster wheel. By loosening/tightening it one can make incremental up/down setup adjustments but most-of-all, you can adjust the tone to your needs quite quickly.
The armrest is almost "automotive."
The resonator rear is flamed-maple veneer and looks great. It has a small depression in the middle where the bolt secures it to the dowel inside the rim.
The tuners are functional and not fussy.
Note closely the little veneer separation on the sides of the resonator and right above the binding -- this is more-or-less all the way around the edge of the resonator but is absolutely non-structural. It doesn't move. I'm thinking it's just the first layer of the ply veneer shrinking back.
Here's the inside of the rim "as-is" when it came in. Note that someone has tried to use the neck-angle adjuster to reset the neck at a better angle and they've cranked it all the way. I'm used to seeing this on Framus banjos because the earlier ones don't have a tight neck-brace area on the other side of the rim so the adjuster puts all the pressure on the heel/dowel joint which is silly
Anyhow, this is what that adjustment did topside! Do you see the dowel poking into the top of the head? Oh -- no, no, no! So... I backed it off and used shims at the neck heel (more functional) to get the angle where I wanted it, instead.
Note how the top-tension hooks are secured by simple L-brackets. Also -- you can see how the rim/flange/tonering is all one-piece" in here.
The one original "neck brace" screw (to the right) into that flimsy little "tang" and then into the dowel is definitely not enough support to make sure the neck is stable with the pot. I drilled-out and then installed a simple drywall screw into the heel directly where that flange is stiffest. The neck is, now, much more secure and stable and doesn't want to "twist" off-axis.
As a side-note, the small finish crack on the bottom of the heel was there before I drilled, for those of you with microscope eyes!


Comments